
Popcorn Ceiling Removal: What Has To Happen Before Any Paint Goes On
A popcorn ceiling looks simple to paint until you actually try it. The texture drinks up paint, crumbles under roller pressure, and hides every seam problem sitting above it. Removing the texture is usually the better answer, and it is one of the most requested interior upgrades we see in Plano homes built through the seventies and eighties. The work itself is not complicated, but the order of operations matters far more than most homeowners expect. Testing, containment, scraping, repair, sanding, and priming all have to happen before a single drop of finish paint touches that ceiling. Skip any one of those steps and the ceiling will telegraph every flaw the moment afternoon light rakes across it. Here is what has to happen first, in the same order a professional crew actually works through it.
What Has To Happen First in Popcorn Ceiling Removal
Popcorn ceiling removal is a demolition job before it is a painting job, and treating it that way protects both your home and your finished result. The first phase covers three things: finding out what the texture is made of, sealing the room so dust and slurry stay contained, and getting the material off the drywall without tearing up the paper face underneath. Homeowners who jump straight to scraping almost always regret it, because wet texture travels farther than anyone anticipates and gouged drywall doubles the repair work. A crew that plans this phase properly can strip an average bedroom ceiling in a single day with almost no cleanup left behind. The scraping itself is the easy part; everything that makes it go smoothly happens before the blade touches the ceiling. Getting this stage right is what separates a smooth, flat ceiling from one that looks patched and blotchy under recessed lighting.
Asbestos Testing Comes First in Any Popcorn Ceiling Removal
No responsible contractor scrapes an older ceiling without knowing what is in the texture, and this is the single most important step in the entire popcorn ceiling removal process. Acoustic ceiling texture manufactured before the early eighties frequently contained chrysotile asbestos as a binder and fire retardant, and product already sitting on warehouse shelves continued to get installed for years after production changed. That means a house finished in 1983 or 1984 can still have asbestos in the ceiling even though the material was on its way out. Testing is inexpensive and fast, and it involves collecting a small sample of the texture and sending it to an accredited laboratory for polarized light microscopy analysis. Results usually come back within a few business days, and the cost is a rounding error compared to the price of remediating a contaminated house. Until that result is in hand, the ceiling stays untouched and the room stays closed.
If the sample comes back positive, the project changes character completely and the scraping stops being a painting task. Asbestos containing material has to be handled by a licensed abatement contractor working under Texas Department of State Health Services rules, using negative air containment, respiratory protection, and controlled disposal at an approved facility. Some single family owner occupied situations fall outside state licensing requirements, but that legal distinction does not make dry scraping safe, and disturbing the material still releases fibers into a home where a family sleeps. We do not encourage anyone to gamble on that, and we will not perform removal on a positive ceiling. The correct path is abatement first, followed by drywall repair and painting once the space has been cleared. Once the ceiling is properly abated, the finishing work proceeds exactly like any other project.
A negative test result clears the way for standard removal, and it also gives you documentation worth keeping in your closing file. Buyers and inspectors ask about ceiling texture in homes of this age, and a lab report answers the question permanently. Homes built after roughly 1990 in Plano, Richardson, and Allen almost never carry asbestos in the ceiling texture, though many of those ceilings still carry a sprayed acoustic finish that homeowners want gone. Newer texture tends to be a joint compound and polystyrene mix that scrapes off cleanly and poses no health concern beyond ordinary dust. We still test anything of uncertain age, because guessing based on a listing date is not a standard we are willing to work to. Ethics on this point are not negotiable for us, and the extra few days of waiting have never once cost a client anything they regretted.
Room Protection and Containment for Popcorn Ceiling Removal
Once testing clears, containment becomes the priority, and thorough masking is what makes popcorn ceiling removal a controlled process instead of a disaster. Everything portable leaves the room, and anything too large to move gets wrapped completely in plastic sheeting and taped shut at every seam. Floors receive heavy plastic followed by a walkable layer, because wet texture that lands on carpet and gets stepped on will grind straight into the fibers and stay there. Walls get sheeted from the ceiling line down, since the scraper pushes slurry outward in every direction and baseboards collect it fast. Doorways get zipper closures, and HVAC registers get sealed so airborne dust cannot ride the return line into the rest of the house. A properly prepped room looks excessive right up until the first pass of the scraper proves why it was necessary.
Electrical work has to be addressed before anyone lifts a wet tool toward the ceiling, and this part gets rushed constantly on do it yourself projects. Power to ceiling fixtures and fans gets shut off at the breaker, not just at the wall switch, and the fixtures themselves come down entirely. Junction boxes get capped and taped so water and compound cannot reach the wiring or the connections inside. Ceiling fans, in particular, need to come off their mounts rather than get wrapped in place, because the fan blades and motor housing collect debris that is nearly impossible to clean later. Recessed lighting cans get masked and sealed at the trim ring, and any smoke detector in the work area gets removed and bagged. Water and live circuits do not belong in the same room, and this is a step we never shortcut.
Ventilation and dust control round out the containment plan, and the approach shifts depending on the season. Fall in North Texas gives us mild afternoons and open window opportunities that make drying and airing out far easier than a humid July stretch. Lower humidity also means joint compound sets and dries on a predictable schedule, which shortens the whole project by a day or more compared to peak summer. We still run air scrubbers or fans directed out of the space during sanding, because even asbestos free ceiling dust is fine gypsum particulate that irritates lungs and settles on everything. Crews wear respirators and eye protection throughout, and the containment stays sealed until the sanding phase is fully complete. This is exactly the kind of detailed preparation that makes the difference between a clean job site and a house you cannot live in for a week.
Wetting and Scraping During Popcorn Ceiling Removal
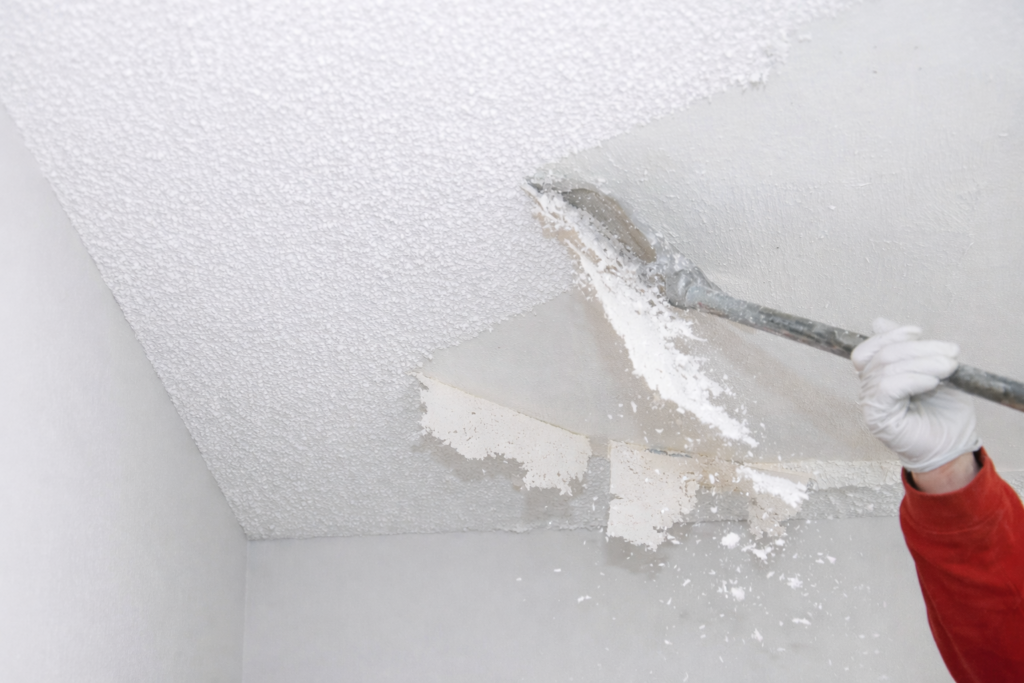
The actual removal starts with water, and understanding why is the key to popcorn ceiling removal that does not destroy the drywall underneath. Acoustic texture is water soluble in its unpainted state, so a light misting breaks the bond and lets the material release in sheets rather than chips. A pump sprayer applies a fine mist across a manageable section, usually four feet by four feet, and then the section sits for roughly fifteen minutes to absorb. Soaking it too heavily saturates the drywall paper and turns a repair job into a replacement job, so the goal is damp and not dripping. The texture should feel soft and give slightly under a fingertip when it is ready. Working in sections keeps the wetted area from drying out before the scraper reaches it.
Scraping technique matters just as much as the wetting, and the tool choice tells you a lot about how the job will turn out. A wide blade held at a shallow angle removes texture in long pulls without digging trenches into the gypsum face, and rounding or taping the blade corners prevents the leading edges from scoring lines across the ceiling. The scraped material drops onto the plastic below and gets collected as it accumulates, since wet compound left to sit will bond to the sheeting and to itself. Corners, edges, and the perimeter near crown molding take slower hand work with a smaller tool. Some sections will resist and need a second misting rather than more force. Patience here saves hours of skim coating later, and forcing a dry section is the fastest way to add repair work you did not plan for.
Painted popcorn ceilings behave completely differently, and homeowners are frequently caught off guard by this. A coat of paint over the texture seals it against water, so misting simply beads up and runs off without ever reaching the material underneath. These ceilings have to be scraped dry, which is slower, dustier, and much harder on the drywall face below. In many painted cases the better solution is skimming a new smooth surface directly over the existing texture, or covering the ceiling with a fresh layer of drywall. We evaluate that during the estimate and give you an honest comparison of labor, cost, and outcome for each path. Want a smooth ceiling handled from testing through final coat? Click here for our interior painting services.
Drywall Repair and Priming After Popcorn Ceiling Removal
Stripping the texture is only the halfway point, and what is left behind is rarely ready for paint. Builders who sprayed acoustic texture knew it would hide imperfections, so the drywall underneath typically received a minimal finish with taped seams and little more. Screw dimples, ridged joints, tape edges, and small tears in the paper face all become visible the moment the popcorn is gone. This second phase brings that surface up to a finish quality that will hold paint evenly and look flat under real lighting conditions. It takes multiple days because compound has to dry between coats and rushing that step produces cracking and shrinkage. Ceilings are also the least forgiving surface in any house, since light travels across them at a low angle and magnifies anything that is not truly flat.
Skim Coating the Ceiling After Popcorn Ceiling Removal
Skim coating is the repair phase that turns a stripped ceiling into a paintable surface, and it is where most of the labor in popcorn ceiling removal actually lives. The process starts with an inspection of every seam, fastener, and corner across the entire ceiling plane, marking anything that needs attention. Loose or bubbled tape gets cut out and replaced, popped screws get reset and dimpled, and torn drywall paper gets sealed so it will not bubble when wet compound goes over it. Only after those repairs are addressed does the broad skim work begin. Applying compound over a failing seam simply delays a crack that will show up within a year. Thorough repair at this stage is what makes the finish coat last.
The skim itself goes on in thin, overlapping passes with a wide knife or a finishing trowel, feathered so the edges disappear into the surrounding surface. Most ceilings need two coats, and rough ones need three, with each layer drying completely before the next goes on. Lightweight all purpose compound works well for the initial fill, while a topping compound gives a smoother final pass and sands with far less effort. Cool fall weather in Plano actually helps here, since moderate temperatures and lower humidity let each coat cure evenly instead of skinning over on top while staying wet underneath. Trying to force dry time with heat causes shrinkage cracks that reopen the exact defects you were covering. We plan the schedule around real dry times rather than optimistic ones.
Homeowners often ask about retexturing instead of going smooth, and it is a legitimate choice worth thinking through. A knockdown or orange peel texture hides minor imperfections and costs less in labor than achieving a truly flat ceiling, which requires the highest level of drywall finish. A smooth ceiling looks cleaner and more current, and it is what most buyers in this market expect to see now. The tradeoff is that a smooth ceiling shows every wave, ridge, and roller mark, so it demands more skim work and more careful sanding. We walk through both options during the estimate with clear pricing for each. Need seams, cracks, or damaged drywall handled properly? Click here for our drywall repair services.

Sanding and Light Checks After Popcorn Ceiling Removal
Sanding is the quality control step of popcorn ceiling removal, and it decides how the ceiling looks for the next fifteen years. Pole sanders with fine grit screens knock down ridges and trowel marks across the broad areas, while hand sanding handles the perimeter and any tight corners. The goal is a uniformly flat plane, not a polished one, and oversanding cuts through the compound and exposes the drywall paper underneath. Sanding sponges work better than rigid blocks near wall lines where a hard edge would scuff the paint. Dust collection attachments cut the mess substantially, though the containment stays up regardless. This phase generates the finest particulate of the entire project.
Light checking is what professionals do that homeowners almost always skip, and it catches problems while they are still fixable. A bright work light held flat against the ceiling and aimed across the surface casts shadows off every high spot and low spot in the plane. Defects that are invisible under normal overhead lighting jump out immediately at that angle, and each one gets circled with a pencil for another pass of compound. On a large ceiling this process repeats several times, moving the light methodically across every section. It feels tedious, and it is exactly why a professionally finished ceiling looks different from one done over a weekend. Finding a flaw now costs ten minutes; finding it after the finish coat costs an entire day.
Final cleanup before priming removes every trace of sanding dust from the surface and the surrounding room. Vacuuming the ceiling with a brush attachment pulls the bulk of it, followed by a tack cloth or a lightly dampened microfiber pass to catch the residue. Primer applied over dust never bonds correctly, and the result is a ceiling that flakes or peels years earlier than it should. Wall tops, window sills, and any surface that collected fallout gets wiped down at the same time. Fresh plastic sometimes goes down over the floor covering if the original layer is heavily loaded. A clean surface is the last requirement before any coating goes on.
Priming Bare Drywall After Popcorn Ceiling Removal
Priming is the step that makes paint behave, and it is the true dividing line in popcorn ceiling removal between preparation and finishing. A stripped and skimmed ceiling is a patchwork of bare drywall paper, dried joint compound, and old painted areas, and each of those materials absorbs paint at a completely different rate. Rolling color directly over that mix produces flashing, which shows up as dull and shiny patches that map out every repair you just made. A dedicated drywall primer sealer evens out the porosity so the finish coat lays down uniformly across the whole plane. It also gives the topcoat something consistent to bond to, which extends the life of the paint job considerably. This is not an optional step, and no amount of extra finish coats will fix a ceiling that was never primed.
Primer selection depends on what the ceiling has been through, and the choice is worth getting right. A polyvinyl acetate primer is the standard for new and freshly skimmed drywall, sealing the paper and compound efficiently at a reasonable cost. Ceilings with water staining, smoke damage, or tannin bleed need a stain blocking primer, usually shellac or oil based, because water based products will let those stains ghost right back through the finish. Kitchen ceilings frequently need degreasing and a bonding primer to handle years of accumulated cooking residue. Applying the wrong primer means discovering the mistake after the finish coat, which means starting the coating process over from the beginning.
Application deserves the same care as the finish coat, since primer coverage failures show up in the final product. A three quarter inch nap roller cover holds enough material to coat a textured skim evenly without leaving stipple, and cutting in at the wall line first keeps the edges consistent. Working in overlapping sections while the edge is still wet prevents lap marks from setting into the surface. Full recommended dry time has to pass before the finish coat goes on, and shortcutting it causes adhesion problems that appear weeks later. Once the primer is dry, a final light check catches anything the previous rounds missed, and small touch ups get spot primed before painting. At that point, and only at that point, the ceiling is genuinely ready for paint.
Why You Need a Professional Crew for Popcorn Ceiling Removal
Popcorn ceiling removal is one of the few home projects where the preparation carries more weight than the finish work. The material handling, the containment, the drywall finishing, and the priming each require specific knowledge, and a mistake in any of them shows up permanently overhead. A crew that does this regularly moves through the whole sequence in a few days with the house still livable, while a first attempt commonly stretches into weeks of frustration. The finished result also affects resale, since smooth ceilings read as updated and popcorn reads as dated to nearly every buyer walking through. Venture Painting handles the entire process from lab testing through the final coat, with one team responsible for the outcome. Fall is the ideal window for this work, and our schedule fills quickly once the weather turns.
The Hidden Costs of DIY Popcorn Ceiling Removal
The tools for popcorn ceiling removal look inexpensive, and that surface level math is what pulls most homeowners into attempting it. A scraper, a pump sprayer, and a few rolls of plastic cost very little at the store. The real expenses show up in the drywall finishing, where a lack of experience turns a two coat skim into four coats and a mountain of sanding. Renting or buying pole sanders, taping knives, mud pans, work lights, and a shop vacuum adds up fast, and none of it helps if the technique is not there. Labor is the largest line item on this job for a reason.
Damage repair is the second cost that catches people off guard. Gouged drywall, torn paper face, and oversaturated panels all require patching that goes well beyond a normal skim coat. Water that reaches ceiling insulation or wiring creates problems that are expensive and unpleasant to fix. Texture slurry that gets tracked into carpet or hardwood frequently means replacing flooring that was in fine condition the day before. These outcomes are common enough that we get calls specifically to finish projects that started as weekend plans.
Then there is time, which never gets priced into the original estimate. A single average bedroom ceiling realistically takes an experienced crew two to three days across scraping, repair, drying, sanding, and coating. Doing that alone on evenings and weekends stretches into several weeks with the room unusable throughout. Overhead work is genuinely hard on shoulders, necks, and backs, and most people underestimate it badly. Ready to get a clear price with no surprises? Click here for our interior painting services and schedule your free estimate.
Timing Your Popcorn Ceiling Removal Project This Fall
Fall is the best season of the year for popcorn ceiling removal in North Texas, and the reasons are practical rather than promotional. Moderate temperatures and lower humidity let joint compound dry on schedule, which compresses the timeline and produces stronger, more stable skim coats. Summer humidity slows drying and can leave compound soft underneath a dried surface, setting up cracking down the road. Windows can stay open comfortably for ventilation during the wetting and sanding phases. The whole project simply moves faster in September and October.
The calendar is the other argument for moving now. Interior projects finished in the fall have your ceilings clean and bright before Thanksgiving and holiday hosting arrive. Waiting until November or December means competing for schedule space with everyone else who had the same idea, and it puts dust and plastic sheeting in your house during the weeks you most want it clear. Booking early gives you the choice of dates rather than taking what is left. It also allows time for lab testing without pushing the project timeline.
Combining projects while a room is already emptied and masked makes strong financial sense as well. Ceilings, walls, trim, and doors all get painted more efficiently when the room is prepped once instead of three separate times. Many of our Plano and Richardson clients pair ceiling work with a full interior refresh and save meaningfully on the total. Cabinet refinishing and interior painting also schedule well together during the same fall window. We map all of it out during the estimate so you can see the full scope and cost in one place.
Why Choose Venture Painting for Popcorn Ceiling Removal
Venture Painting approaches popcorn ceiling removal the same way we approach every project, which means detailed preparation and no shortcuts where they would not show. We test before we scrape, we contain the work area completely, and we finish drywall to a standard that holds up under real lighting instead of just looking acceptable in the moment. Our crews arrive on time, keep the site organized, and respect that you are living in the house while the work happens. Every estimate is free and every price is written out clearly before anything starts. You will know the scope, the timeline, and the cost up front.
Ethos matters to us, and ceiling work is where that gets tested most often. We will tell you plainly when a ceiling needs abatement rather than removal, and we will recommend covering over scraping when covering is genuinely the better call for your home. We are not going to sell you a service that is wrong for your situation just because you called asking for it. That honesty has built our reputation across Plano, Richardson, Allen, Addison, Murphy, Parker, and Sachse. Our clients call us back and refer us because the work holds up and the process is straightforward.
We are interior and exterior painting specialists serving Plano and the surrounding communities, and ceiling restoration is regular work for our team rather than an occasional add on. From asbestos testing coordination through drywall repair, priming, and the final coat, one crew stays accountable for the entire result. Call Venture Painting at (214) 233-6044 or email zeb@venturepaintingdfw.com to schedule your free estimate and get your popcorn ceilings handled before the holidays arrive.